Introduction to Starknet Phone
The Starknet Phone project aims to drastically increase mobile UX by incorporating a light client directly into the OS.
If you are interested in contributing check out getting started
Whitepaper (WIP)
Intro
The end goal, at least as professed by most blockchain organizations, of blockchain networks, is decentralization. At its best, it will be a bastion of freedom and security, with peers transacting freely with each other without revealing their identity. To fully realize this goal, permissionless communication with the network is required. To acheive this right now, people can run their own nodes on their own servers and communicate with the network that way. This is both technically challenging, and often expensive, thus becoming prohibitive for users where it is not feasible to do even if desired. True adoption of decentralized networks will not take place until it is easier to use them than not.
How it works
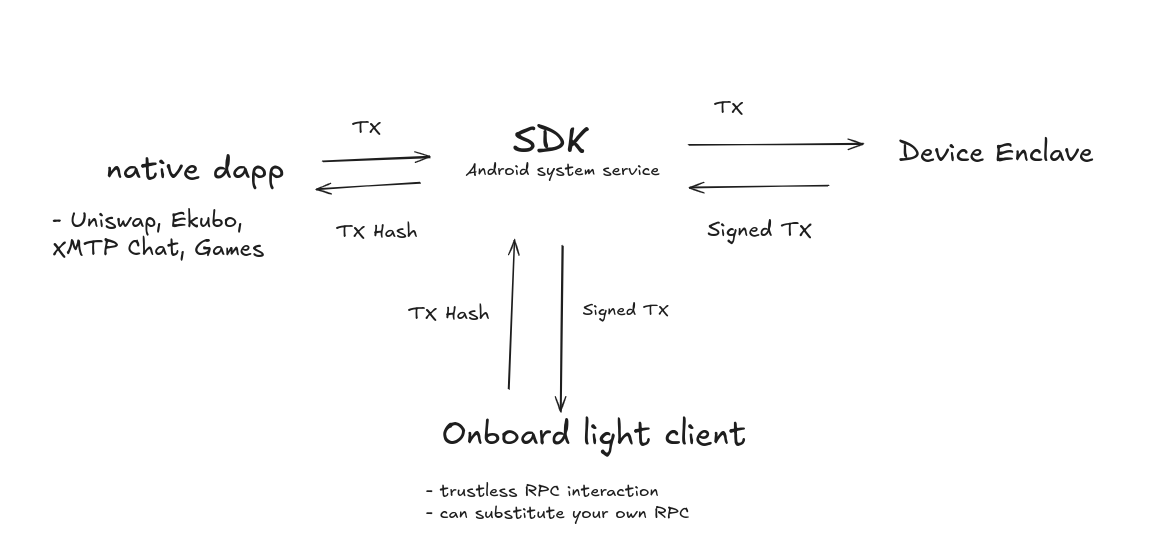
WalletSDK
The WalletSDK runs as an OS level system service, allowing it to be available for all native apps running on the OS.
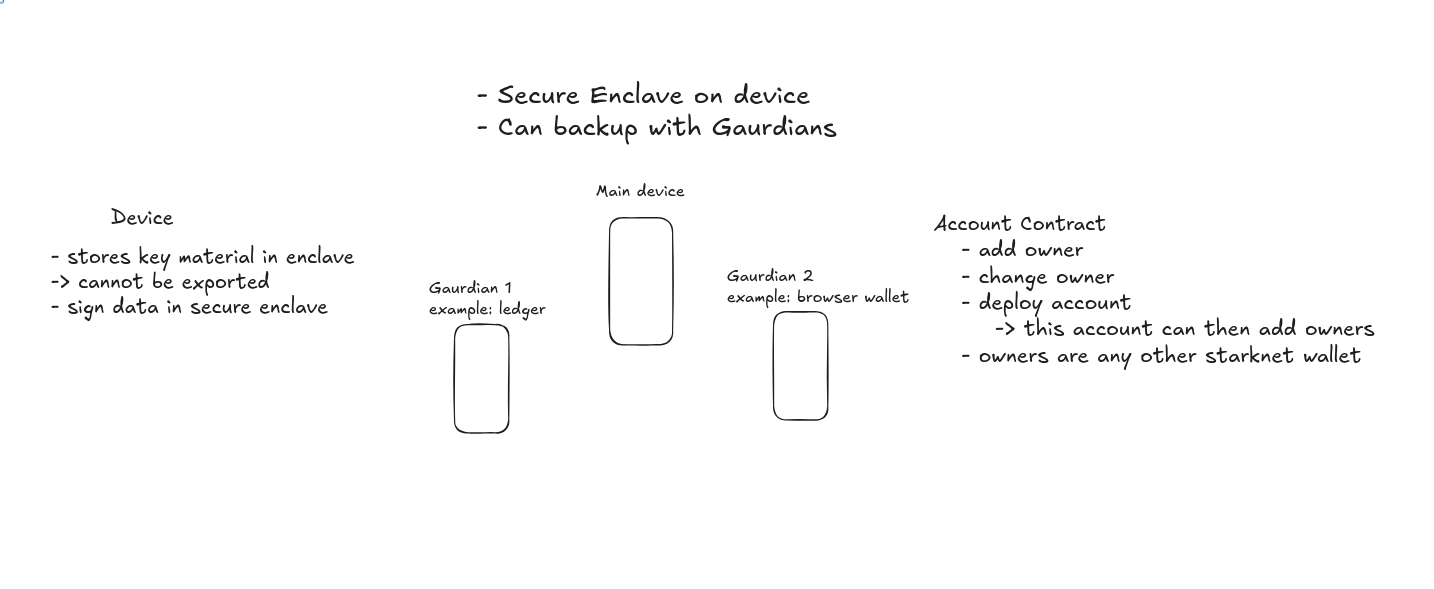
Hardware Signer
Android (Pixel specifically) devices have the ability to sign transactions on an embedded secure element, providing similar security to a cold wallet like a Ledger or Trezor.
Hardware Signer
Why Android
Already, the most recommended and commonplace way to secure private keys is with a hardware device such as a Ledger or Trezor. While these devices do not sacrifice on security, they do sacrifice on user experience. Connecting them to a browser based wallet is ardous, and is a blocker for dApp users who value security. Today, TEEs on Android devices are good enough to serve this purpose, and allow for interaction with the already robust Android app infrastructure.
Furthermore, mobile devices have sensors and data (camera, geolocation, NFC) which can be used by onchain applications, to unlock previously impossible capabilities.
Why Starknet
Two of the largest blockchain networks already have device offerings. Those being the Solana Saga and Seeker, as well as the upcoming dGEN1, which will be shipping with an Ethereum light client on-board. While both of these devices are innovative in their respective ways, Starknet has some unique properties that makes more sense from a consumer device standpoint.
Signing will happen using an on-device TEE, such that the private key used for signing is not exportable from the device. This prevents the key from being extracted in the case of theft, but also means that the key is lost if the device is lost. Account Abstraction on Starknet allows for a system of Gaurdians, where multiple signers can be used to secure an account, and transfer signing capability in the case of a lost device.
Furthermore, Starknet is proving itself to be a hub for onchain games. Many of these games would benefit from being played on a mobile and/or dedicated device where transaction signing can be handled by the OS and moved out of their immediate attention. Native dApps, (both games and financial) can easily interact with a simple API provided by the OS.
References
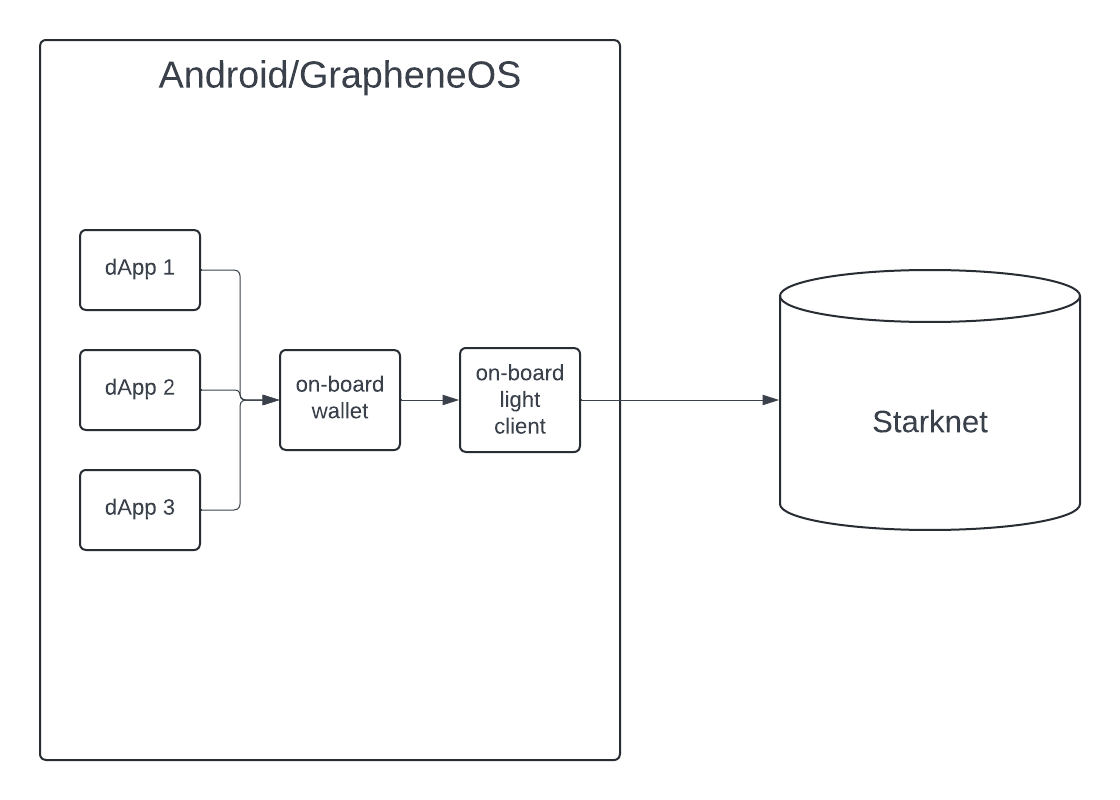
Overview
Starknet Phone works through an on board light client. By implementing a light client and wallet at the operating system level, and taking full advantage of account abstraction on Starknet, we believe that we can drastically improve the mobile UX on starknet.
Architecture
Leveraging secure enclave for hardware signing
The Android side
Android allows for creating and signing with a secure private key that cannot be extracted from the device via the secure keystore system.
Android Keystore Documentation
Some notable features:
- Extraction prevention: key material cannot be extracted from the device in case of theft and cannot be accessed by application processes.
- Hardware security module: similar to a Trusted Execution Environment (TEE), but specifically embedded Secure Elements (eSE) or on-SoC secure processing units (iSE)
- Key use authorizations: specific authorizations can be set (and cannot be changed) to enforce key usage to meet certain constraints such as specific algorithms or time intervals.
The Starknet side
On Starknet, our account implementation needs to allow for this hardware signer.
Account implementation
Getting Started
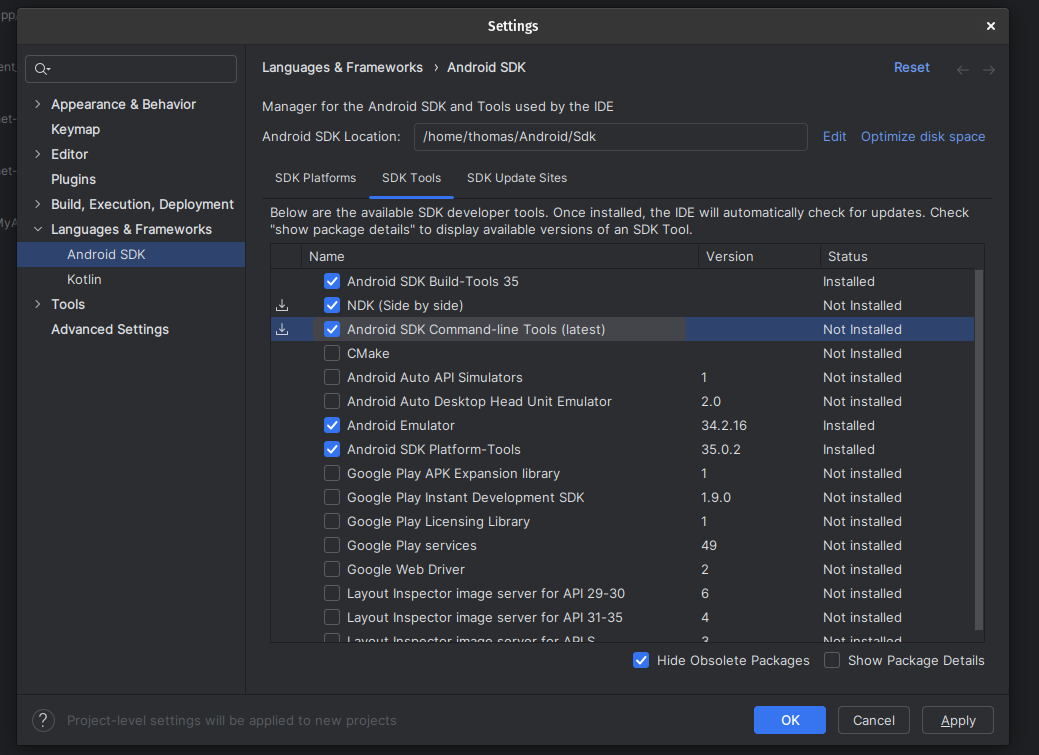
Install Android Studio
Most development, at least starting out, will be on the 3 android applications that form the core of the starknet phone: light client, wallet, and browser.
Installing the build:
- Install Android Studio.
- Create a new device
- Create a fork of this repository, and open the application in Android Studio.
- Refer to the contribution guide for any contributions.
Installing on an emulator
NOTE: We are still working to provide an image for download. For now, development on any of the applications can be done on a generic android OS.
Steps to install on an emulator:
- Download a zip file of the image.
- Make sure Android Studio is installed.
- Navigate to the Android SDK install location. On mac this default to
Library/Android/sdk
cd Library/Android/sdk
Create a new directory called "android-32", and inside that directory create a new directory called "default"
mkdir android-32/default
Extract the zip file of the OS image to the newly created "default" directory
Android Development Crash Course
Because GrapheneOS (and thus Starknet Phone) is based on android, it is compatible with Android native applications. This will be a broad overview of how Android development is approached in this project.
Environment/Android Studio setup
Android applications are best developed in Android Studio or Intellij. This will focus on Android Studio.
Hello World
Below is a full intro course on building a simple android app
A More Complicated Example
This project will place a strong emphasis on Jetpack Compose.
Android provides number of examples using this approach, of which we will be following the decisions of the JetNews example linked below.
Using Rust
In some cases (like the Beerus client) we will not be able to use Kotlin for everything in an application. For this, follow the rust in android guide
Building the OS
Build Dependencies
Baseline build dependencies:
- x86_64 Linux build environment.
- 32GiB of memory or more. Link-Time Optimization (LTO) creates huge peaks during linking and is mandatory for Control Flow Integrity (CFI). Linking Vanadium (Chromium) and the Linux kernel with LTO + CFI are the most memory demanding tasks.
- 100GiB+ of additional free storage space for a typical build of the entire OS for a multiarch device.
Setup for Debiand GNU/Linux 12 (bookworm) based systems:
sudo apt update
sudo apt install repo yarnpkg zip rsync
echo 'export PATH=$PATH:/sbin:/usr/sbin:/usr/local/sbin' >> ~/.bashrc
source ~/.bashrc
More detailed dependencies and build guide can be found here
Downloading the source code
Development Branch
Starknet Phone forks the '14' branch of grapheneOS, which is the main development branch of GrapheneOS.
mkdir starknet-phone-os
cd starknet-phone-os
repo init -u \
https://github.com/suffix-labs/snphone_platform_manifest -b 14
repo sync -j8
Emulator builds
NOTE: must be done from bash or zsh
set up build environment
source build/envsetup.sh
set the build target
lunch sdk_phone64_x86_64-cur-eng
start the build. This can take multiple hours to run.
m
Adding prebuilt binaries
sync repo
mkdir -p android/kernel/6.1
cd android/kernel/6.1
repo init -u https://github.com/GrapheneOS/kernel_manifest-6.1.git -b 14
repo sync -j8
build the kernel image and modules for the emulator
ARCH=x86_64 common/build_virt.sh
replace the prebuilts in the OS source tree
ANDROID_BUILD_TOP=~/starknet-phone-os ARCH=x86_64 common/update_virt_prebuilts.sh
Rust In Android
Because there are a lot of starknet libraries in rust, and the beerus client is written in rust, being able to run rust code on android is important for reaching MVP.
The process for running a minimal rust "hello world" library on android is as follows:
Get dependencies
Install NDK from android studio
Add rust dependencies
cargo install cargo-ndk
rustup target add x86_64-linux-android
Update Cargo.toml
[lib]
crate-type = ["cdylib"]
[dependencies]
jni = "0.21.1"
Implement the Java side
We will be creating a Java class to interact with our rust library as follows:
package com.example.rust_example;

public class RustLib {

    // define the interface for using the rust library below
    public static native String hello(String input);

    static {
        // here we load the rust library we created
        System.loadLibrary("example_rust_project");
    }
}
Writing the rust side
We will write rust code that compiles as C code to match the C header generated when compiling the Java library created in the previous step. Use javac to compile the Java class into a C header.
javac RustLib.java -h .
The output is shown below:
/* DO NOT EDIT THIS FILE - it is machine generated */
#include <jni.h>
/* Header for class com_example_rust_example_RustLib */

#ifndef _Included_com_example_rust_example_RustLib
#define _Included_com_example_rust_example_RustLib
#ifdef __cplusplus
extern "C" {
#endif
/*
 * Class:     com_example_rust_example_RustLib
 * Method:    hello
 * Signature: (Ljava/lang/String;)Ljava/lang/String;
 */
JNIEXPORT jstring JNICALL Java_com_example_rust_1example_RustLib_hello
  (JNIEnv *, jclass, jstring);

#ifdef __cplusplus
}
#endif
#endif
Now we implement this C header in rust.
#![allow(unused)]
fn main() {
use jni::{
    objects::{JClass, JString},
    sys::jstring,
    JNIEnv,
};

use super::hello;

#[no_mangle]
pub extern "C" fn Java_com_example_rust_1example_RustLib_hello<'local>(
    mut env: JNIEnv<'local>, // this is the class that owns our static method
    _class: JClass<'local>,
    input: JString<'local>,
) -> jstring {
    // getting the input string from our android app out of java
    let input: String = env
        .get_string(&input)
        .expect("Couldn't get java string!")
        .into();

    // creating a new java string to return to our android app
    let output = env
        .new_string(hello(&input))
        .expect("Couldn't create a java string!");

    output.into_raw()
}
}
Building for android
Run
make build-android
Copy the .so file from 'target/x86_64-linux-android/release/libexample_rust_project.so' to 'app/src/main/jni/x86_64/libexample_rust_project.so' so the android app can read compiled native code.
Use the library like any other library.
package com.example.rust_example

import androidx.appcompat.app.AppCompatActivity
import android.os.Bundle

class MainActivity : AppCompatActivity() {

    override fun onCreate(savedInstanceState: Bundle?) {
        super.onCreate(savedInstanceState)
        setContentView(R.layout.activity_main)

        val result = RustLib.hello("TEST")
        println(result)
    }
}
Add the following to your build.gradle file to link the library:
sourceSets {
       named("main") {
           jniLibs.srcDir("src/main/jni/")
           // Configure the JNI libraries directory
           // Note: For newer configurations, JNI libraries are often managed differently
           // Check your specific plugin version's documentation for precise configuration
       }
   }